I'm
very excited, I etched my first copper plate today! I used non-toxic + traditional (toxic!) methods, so it was a little bit nostalgic working on my plate today since it was similar to working on zinc as I had experienced at university years ago. I used two different sugar lift grounds with traditional hard ground, applied a spray-paint aquatint, incised lines with a wooden stick, and and etched it in ferric chloride.
 |
Copper plate with sugar lift and hard ground, waiting
for lift-off in a pan of warm water. |
The smell of the hard ground was the nostalgic part and of course the toxic part. I had not used or really smelled it for more than 20 years.
Hard ground is an asphaltum, wax, rosin, and solvent mixture you paint on a zinc or copper plate to keep the acid from attacking the surface. It's just soft enough to scratch through it with a pencil or other tool and can be used with a lift ground. A sugar lift (or lift ground) is a sugar/ink/soap or other water-soluble mixture you paint or dribble onto a metal plate and let dry. The plate and dry lift ground is then covered with the
hard ground and placed in warm water. The lift ground lifts up, taking bits of hard ground with it, leaving the rest of the plate covered in hard ground and impervious to acid attack.
 |
| Sugar lift was very slow, so I heated it up on a hot plate. |
The voids and lines can be etched right away or an aquatint applied and then etched. An aquatint will create solid tonal areas that can resemble a wash (Hence the name "aquatint") rather than an area of open-bite. An easy (And slightly more modern) way to get an aquatint is with spray paint or an airbrush. The traditional method is done with
rosin dust, which once melted onto the metal plate, creates a tiny dot pattern that holds the ink. Spray paint does the same thing in a fast and easy way. That's what I used on the lifted areas of my plate. Were there some bugs in the process? Of course! The hard ground was too "hard" (Not softened a bit with the addition of turpentine) and didn't lift right away as it should....so my plate spent a few hours in hot water!
 |
The sugar lift was successful! Notice the bright
copper areas; these will be sprayed with paint to create tonal areas. |
Once the sugar lifted, I etched the plate for 10 minutes and checked the aquatint with a loupe. It looked pretty good but just to make sure, I put it back into the tank for 5 more minutes. Then I took it out, rinsed it and added some incised lines into the hard ground. I sprayed it again with the spray paint aquatint and put it in the acid one more time for 10 more minutes. Rinse, clean, inked it up with some non-toxic
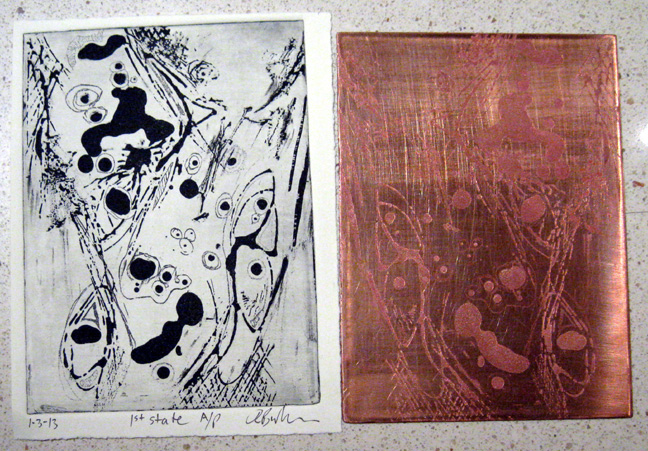
Akua ink and I have a proof of the first state!
 |
| Proof next to plate. Copper plate is only 4-1/5" x 6". |
Now you can see the nice solid black areas of aquatint. The broken lines were created by painting with the standard aquatint solution using a rigger brush, the other lines were drawn using my stick. The dots and blobs are done with a sugar lift aqua tint- my own formula using Karo.
 |
| Proof printed on domestic etch paper. |
 |
| Better image of the plate. |
Next Monday afternoon, I will be working this plate a bit further to fine-tune the image. It's totally abstract at this point but I see possibilities...shapes, images, etc. So I don't know exactly how it will develop but it will be fun to print off an edition or some more monoprints when it's finished.
I'm hoping to get quite a bit of this plate done next week since a new
Intro to Printmaking class starts Jan. 10th on Thursdays at The Drawing Studio print lab. I'm going to be kind of a TA, helping Tom Lindell and Jennifer Clarke...mostly helping out during the Solarplate sessions and the cyanotype session! You can find the class
here on page five of the online catalog.
Until next week,
Ciao,
~Reb


No comments:
Post a Comment