First, ImagOn day
I'm playing catch-up with the non-toxic printmaking classes, and as promised, some photos from the ImagOn day and cyanotype day!
On February 7th, we had a demonstration of applying DuPont ImagOn film onto copper plates and creating intaglio-type plates. The film is used for various photo-intaglio processes and is more versatile than Solarplates in that a plate can be worked further using additive methods once the film is on and already exposed and developed. You expose the ImagOn film similarly to a Solarplate; double exposure method using an aquatint screen and a film positive. The main difference is that to develop the image, it's washed in sodium carbonate or washing soda rather than plain water. You can apply the film to various smooth, flat substrates, even copper as we did; later you can even remove the film later and start over with a clean plate and create a new image. Good to know when you screw up your image!
 |
| Applying ImagOn film to copper. |
 |
| Vacuum frame and exposure unit (looks like a microwave). |
 |
| Close up of Tom's home-made vacuum frame ready to expose a plate to the aquatint screen. |
The students had success applying the film but we all had trouble with overexposure in the UV light box we were using. So no photos of the students prints.
 |
| Developing ImagOn in washing soda. |
Some students removed their film and applied more film and a new image later. I will have to post photos of those prints at another time. The demo plate I made used a fabulous toner wash (copy machine toner + Future floorwax+ alcohol+ detergent) but it resulted in an overexposed plate. Not the best print. Since it wasn't an interesting print, I added Speedball screen filler (A red acrylic-based liquid used as a silkscreen stop-out) to the plate and let it dry.

My plate shows the red squiggles of the screen filler; the blue is the ImagOn film. You can see some of the aquatint on both the plate and especially on the print above. The screen filler shows as the grey "worms"; the solid black areas are from my toner wash aquatint...the parts that did work. So I saved the plate....at least enough to show the students that you can add to a plate later and make it into something interesting! This process is incredibly versatile so in the future, I'd like to stretch this process into a two or three session class so we can really delve into everything you can do with ImagOn.
**********************************
February 14th, Cyanotype day
I mostly taught this process with help from Tom since we are both really familiar with
cyanotypes. The students had very good success and we even did some tannic acid toning. The process is simple: apply a
light-sensitive iron salt solution to paper, expose to UV light or the sun using a film negative or various found objects, wash with plain water to develop the characteristic blue color. Once it's dry, you can tone it with
tannic acid to change the color to brown or something in-between and if you are careful, you can create a split-tone image. You can also bring out more mid-tones and intensify the blue by dipping the print in a weak solution of hydrogen peroxide. I added about a cap full to our tray
after the print was developed in plain water. (If you develop it in the peroxide right away, you loose much of the blue and the print ends up looking over exposed).
 |
| Coating paper with solution. |
 |
| Developing a print in tap water. |
 |
| Intensifying the blue with a dip into a hydrogen peroxide solution. |
 |
| A drawing on acetate. |
 |
| A drawing on acetate- a film positive. |
 |
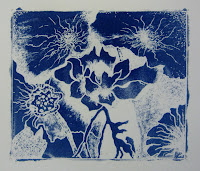
| Leaves and string. |
 |
| A toned print that turned a beautiful grey-taupe color. |
After the prints are developed (blue) and dry, you can tone them. For toning, you "bleach" the print until the blue turns a light beige or grey in a weak washing soda bath, then put it into a tannic acid bath until it turns brown. If you take the print out before it's entirely bleached, you can get a greyish-purplish-taupe tone or a two-tone effect after it goes into the tannic acid bath. You just have to play with the toning process. Often, the darker blue prints yield better brown tones.
 |
| Our toning trays set up. |
 |
| Print soaking up the tannic acid. |
 |
| A toned print made from a drawing on wax paper. Areas of blue in the brown-grey tone makes this a split-tone print. |
 |
| A selection of student prints. My brown-toned demo prints are near the center. |
 |
| A photographic image I used to create a valentine. Note the white heart in the lower right corner. |
It was Valentines Day, so a few students created a few fun valentine's "cards" for friends. With prompting from other students, I made the print of Barbie doll photo (See above) for the woman who works at the front desk at The Drawing Studio. She saved the workshop by providing hydrogen peroxide from the medicine cabinet for us to use for developing prints. It wasn't entirely necessary but it was really nice to have. We added the cut-out heart to the negative, toned the print and colored in the heart with red colored pencil. She was very surprised and pleased we had thought of her! It made for a nice ending to a long day of fun.
More next week!
~Reb


No comments:
Post a Comment