Thursday, January 31, 2013

Non-toxic printmaking class: Solarplate 101

Today was an exciting day! I got to teach an intro to Solarplate class to five students. We used the Solarplates sold here and since The Drawing Studio didn't have any black Akua ink for the class, the students used Faust Warm Black oil-based ink since it's a rather fat (high in oil and very buttery) ink and easy to use on a Solarplate.

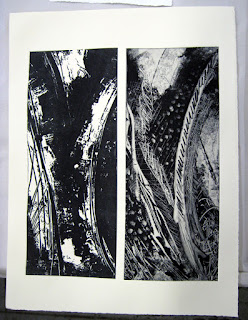
Two methods of image creation were demonstrated: transferring a photo to transparency film using a copy machine (Tom helped students with the copy machine, so I didn't see exactly what he did) and a "freestyle" method of painting on acetate with ink, special Stabilo pencils, and film opaquing pens, which I showed the students. This method consists of creating a black painting or drawing on a piece of acetate, then dusting it with baby powder to set the material, then using the image as a film to create a Solarplate in a UV exposure unit. (Sold here). It's a fun process that is more about exploring mark-making. My demonstration print is at the bottom of the page. 

Here are some of the prints and plates some of the students made today. Excellent work students!  

Plate printed twice, with the plate
inked in a different color, then flipped around. 
Photo transferred to acetate with a copy machine
with added drawing using an opaquing pen. 
Print, inked Solarplate, and the drawing on
clear acetate that was used to create the plate. 
A print and the plate. This student used ink on acetate to
create a compelling image.
A print pulled from a Solarplate created from a drawing on acetate. 
Two prints on the left and the plate on the right. This plate was
created using a film made from a photo in a copy machine. 
The demonstration plate I made is on the right, the
plate on the left is a companion relief plate I created a few days earlier. 
The student seemed to enjoy the process and a couple of students made two Solarplates. Next week, ImagOn film!
Later,
~Reb


Wednesday, January 30, 2013

Testing printmaking paper, part 1

Last week, I received a bunch of paper samples from a gentleman that did a talk about paper at The Drawing Studio on January 20th. He's a printmaker and works at a local art supply store, Sarnoff. I used my small copper plate and black Akua ink in the Fabriano tests. Here is what I discovered so far.

First up, Fabriano Rosaspina in White and Ivory. No external sizing, 60% cotton rag, two deckle edges. Known as an underutilized printmaking paper; it has an excellent surface quality, a matte finish, and soaks up the ink like a sponge, and the ivory colored paper is really interesting. It's more tan than yellowish despite my shadowed and off-color photos. (I took the photos in my studio at night, so the lighting was pretty uneven). I really like this paper. I soaked it the recommended 30 minutes and it printed just beautifully  This paper is a keeper. Interesting trivia: Italian paper mill Fabriano was started in 1264 and was the first to harness water power for pulping.
Fabriano Rosaspina White

Fabriano Rosaspina Ivory

I also tried Fabriano Tiepolo. This paper is 100% cotton, has four deckle edges, and has a smoother surface. Apparently you can do almost anything with it but for printmaking, it is also excellent. Soak it for 30 minutes and it performs perfectly! Because of it's higher rag content, it should be exceptionally strong.
Fabriano Tiepolo Soft White
Of these three Fabriano papers, I'm not sure which I like best...they are all really awesome papers! I will have to buy a few sheets of each and do further experiments such as try an oil-based ink and Solarplates.

Next up, Awagami paper. I received a large sample pack of Awagami papers and only tested five of several papers that were recommended for printmaking. The sample sheets were smaller, so I used a Solarplate and Akua ink for testing. These are Japanese papers (washi), so they are made of either bamboo or mulbery (kozo). Some of the papers in the sampler were for sumi, watercolor, drawing, etc. and had unusual textures and colors. I just focused on the printmaking papers.
Don't call these rice papers though...there is no such thing. The Japanese do not make paper from rice, never have.
Top three prints, left to right:
Bamboo paper printmaking, 170g/m3, soaked for 5 minutes
Kitakata HM, 100g/m3, dipped in water
Shiramine NM-5, 110g/m3, soaked for 2 minutes

Bottom two prints, left to right:
Bunkoshi, 70g/m3, dipped in water
Bamboo paper printmaking, 250g/m3, soaked for 10 minutes

The labels of each are shown on the front, but I actually printed on the correct side of the paper, so I did a little photoshopping so you can see the label on the front.
Backside of the Awagami paper tests
You can see the labels on the back on the photo above. I'm showing the back so you can see how thin some of the papers are. A few are little too thin for my taste. My favorite paper of this bunch was the heavy bamboo paper 250g/m3 on the bottom right. It works beautifully after only 10 minutes soaking. The nice thing I noticed about the bamboo paper is that you can see when it's fully saturated with water. It soaks it up and actually changes color a bit. The soaking times for each sample were figured out on my own according to weight. The papers that were very thin, I quickly dipped into the water but a spray bottle would be even better. I have more paper to test, so look for more Awagami experiments. I have no idea how much any of these papers are but I will go to Sarnoff and see. They are definitely worth checking out.
Tomorrow I'm going to be teaching the Solarplate class to the non-toxic printmaking students.  I will take photos of course. Wish me luck!
~Rebecca

Monday, January 14, 2013

Danger! Being an artist is hazardous to your health.

Since learning new non-toxic printmaking practices, hanging out at The Drawing Studio print lab (mostly non-toxic), and helping out the students in the non-toxic intaglio printmaking classes, I have discovered many things about the safety of art materials! Most are not very safe at all, especially printmaking. Even "semi-non-toxic" isn't really ideal. I would add oil painting and ceramics to the list of next most toxic art making practices as well. I've been printing using the non-toxic methods since I took the workshops at Making Art Safely in Santa Fe and am doing pretty well with staying safe but I could do much better.


However, in the last 10 days, I decided to try a traditional printmaking process: using petroleum-based hard ground, a spray paint aquatint, and turpentine/spirits to make an image on a copper plate. The copper plate was very small and I used good ventilation. I sprayed the enamel outside with a mask. I wore gloves. I kept all containers closed and only poured a tiny amount of hard ground into a dish and kept that covered. Despite all of the precautions, I still noticed the effects of the solvents: sore throat and a cough that lasted for two days after I did the aquatint. The smell of the materials was nostalgic, the effects were a huge red flag.
So what did I learn in the last three print lab sessions? That this stuff is toxic and you shouldn't use it. 
No more hard ground, no more spray paint, no more paint thinner. And certainly no oil-based printmaking inks, at least for me anyway. I truly love my Akua inks and they do work on copper really well. 

I used denatured alcohol for years at a former job. We used it to clean everything. Gallons of it. I now hesitate to use it to wipe off the press bed, like I have been doing since I started working at the print lab. I will be switching to ethyl alcohol or even start bringing my own cheap vodka in a spray bottle. Solvents, even "no-odor solvents" like "odorless turpentine" have VOCs and are still toxic even if they don't have much odor. VOC=Volatile Organic Compounds. VOCs are VERY BAD for you.  
If you are an artist, take the time to read the Safe Painting Guide on this website. (Scroll down and make sure you check all of the links).
 It's quite a bit of information but please persevere. Read it twice if you teach art and commit it to memory if you teach children. Read and find out more about safe solvents and safe materials. Here is a list of what I already do at the print lab and what every artist should consider if you are using oil-based paints, solvents, chemicals, glazes, and similar stuff to make your art. These are also the same rules I tell my students and practice in my own studio.
  • Hands are clean, keep them clean! Clean hands mean clean paper, clean art, and a safer studio.
  • Wear non-latex gloves unless handling paper.
  • Absolutely no food or open beverage containers in studio work areas. Eat in the kitchen or dining area.
  • Use unscented Baby Wipes to keep hands clean before picking up paper. Baby wipes will remove Akua ink from your hands. 
  • Use non-toxic ink for printmaking if possible. I use Akua for intaglio and monoprints. 
  • Wear an apron or lab coat to keep artists materials off your clothing. Don't take this stuff home with you.
  • Use safe solvents and cleaners: ethyl alcohol, vinegar, vegetable oil, orange zest solvents, soy-based cleaners, etc.
  • Use safe materials for making the images: acrylic-based stop out and ground, vegetable oil-based lift grounds, acrylic airbrush aquatints, acrylic paint, etc.
  • Read the MSDS. If you teach art, you are required to have these for every solvent and art materials you might supply. 
  • Clean up as you go; wash hands before and after lunch.

Now that I think about it, if the product states "Use with adequate ventilation", then I don't need to use it to make art, do projects in my garage, or paint my living room. "No-VOC should become your mantra. In fact  I did just start painting my guest room over the weekend. I used Glidden Lifemaster paint. You can't get it at the big box store, you have to go to a Glidden (Formerly Dulux Paints) professional paint store but it's soooo worth it. Gorgeous paint. No VOCs at home and no VOCs in the studio! Welcome to the the modern age of green art materials. 
Stay safe!
~Reb


Sunday, January 13, 2013

Copper plate redux and non-toxic hard ground

It was both a frustrating and very good week of printing. Monday the 7th, I had great luck with an aquatint on the copper plate (traditional hard ground and spray enamel) but really poor luck with two different sugar lift ground experiments. Luckily, I ran out of time Monday afternoon, so I just left the last lift ground as is, no etching. It was the right choice....on Thursday, things were working much better. 
Second state showing the proof and plate with the added aquatint
Thursday was a special day (And long- the class is 9:00am to 4:00pm) with much rushing around and activity. The first day of the "Intro to Non-toxic Printmaking" class at The Drawing Studio. I was mostly assisting, so I was able to observe some new interesting techniques and also work a bit on my own work. Strangely enough, while I was using traditional hard ground on my copper plate, the students were shown how to use acrylic-based grounds on their copper plates. Acrylic floor "wax" makes an excellent hard ground! Apparently this brand is really good; you just add some India ink to tint it. 
Non-toxic hard ground
Once the plate is beveled, cleaned, abraded with fine sandpaper and degreased, you coat the plate with this stuff by pouring it on, holding it almost vertically over a tray. You want a thin, even coat. Clear packing tape makes a "handle" so you don't disturb the surface.
Pour it on
Walk it off
To get rid of the excess floor wax that accumulates on the bottom edge of the plate, you "walk it" onto some newsprint or phone book paper. You don't want a thick edge of floor wax on your plate. After that, you can air dry it in the sun or put it in a hot box to speed up the drying process. After it's dry, you can scratch through it just like regular hard ground and etch it in ferric chloride. It's a wonderful alternative since it's odor-free, relatively non-toxic, and you can remove it later with sodium carbonate (washing soda). Sodium carbonate breaks the long polymer chains of the acrylic and becomes a safe solvent for clean up. Alternatively, a non-toxic citrus-based solvent can be used to remove acrylic floor wax ground from a metal plate. 

After lunch, the students worked on their plates and while I created a successful sugar lift ground on the copper plate and etched fairly deeply. 
Proof of the third state with added lift ground. 
Later that night, I brought the little proof I had printed to an art critique and the other three artists deemed this print "looks finished". I think it looks pretty good, but I will see when I see it again with fresh eyes tomorrow! 

While I was etching the copper and the students were working away, I printed a couple of monoprints from a Solarplate I had neglected- it was from the Santa Fe workshop with Dan Welden. The image was made by drawing with a waxy crayon onto frosted glass and using the glass to create an image on the plate. I've been using it a few times, usually printing it with another plate, but it's always been subordinate. This time, I made it the star and I was pleasantly surprised at the results. You may recognize it...it's been used for both Fig. 16 and Fig. 21. 
Abstraction, Blue & Yellow 2


Abstraction Blue & Green 1
These two also went to the critique. Both got very positive feedback, so I will continue working with this plate this week. Tomorrow I will play around with the little copper plate and see if it's finished. It may very well be. 
Ciao,
~Rebecca

Friday, January 4, 2013

New for 2013: new ways with old techniques- etching metal

I'm very excited, I etched my first copper plate today! I used non-toxic + traditional (toxic!) methods, so it was a little bit nostalgic working on my plate today since it was similar to working on zinc as I had experienced at university years ago. I used two different sugar lift grounds with traditional  hard ground, applied a spray-paint aquatint, incised lines with a wooden stick, and  and etched it in ferric chloride.
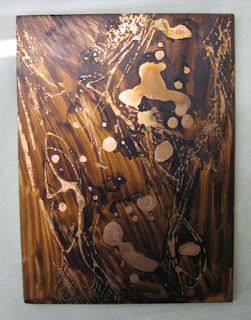
Copper plate with sugar lift and hard ground, waiting
for lift-off in a pan of warm water.
The smell of the hard ground was the nostalgic part and of course the toxic part. I had not used or really smelled it for more than 20 years. Hard ground is an asphaltum, wax, rosin, and solvent mixture you paint on a zinc or copper plate to keep the acid from attacking the surface. It's just soft enough to scratch through it with a pencil or other tool and can be used with a lift ground. A sugar lift (or lift ground) is a sugar/ink/soap or other water-soluble mixture you paint or dribble onto a metal plate and let dry. The plate and dry lift ground is then covered with the hard ground and placed in warm water. The lift ground lifts up, taking bits of hard ground with it, leaving the rest of the plate covered in hard ground and impervious to acid attack.
Sugar lift was very slow, so I heated it up on a hot plate.
The voids and lines can be etched right away or an aquatint applied and then etched. An aquatint will create solid tonal areas that can resemble a wash (Hence the name "aquatint") rather than an area of open-bite. An easy (And slightly more modern) way to get an aquatint is with spray paint or an airbrush. The traditional method is done with rosin dust, which once melted onto the metal plate, creates a tiny dot pattern that holds the ink. Spray paint does the same thing in a fast and easy way. That's what I used on the lifted areas of my plate. Were there some bugs in the process? Of course! The hard ground was too "hard" (Not softened a bit with the addition of turpentine) and didn't lift right away as it should....so my plate spent a few hours in hot water!
The sugar lift was successful! Notice the bright
copper areas; these will be sprayed with paint to create tonal areas. 
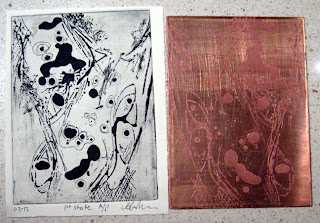
Once the sugar lifted, I etched the plate for 10 minutes and checked the aquatint with a loupe. It looked pretty good but just to make sure, I put it back into the tank for 5 more minutes. Then I took it out, rinsed it and added some incised lines into the hard ground. I sprayed it again with the spray paint aquatint and put it in the acid one more time for 10 more minutes. Rinse, clean, inked it up with some non-toxic Akua ink and I have a proof of the first state!
Proof next to plate. Copper plate is only 4-1/5" x 6". 
Now you can see the nice solid black areas of aquatint. The broken lines were created by painting with the standard aquatint solution using a rigger brush, the other lines were drawn using my stick. The dots and blobs are done with a sugar lift aqua tint- my own formula using Karo.
Proof printed on domestic etch paper. 
Better image of the plate.
Next Monday afternoon, I will be working this plate a bit further to fine-tune the image. It's totally abstract at this point but I see possibilities...shapes, images, etc. So I don't know exactly how it will develop but it will be fun to print off an edition or some more monoprints when it's finished. 

I'm hoping to get quite a bit of this plate done next week since a new Intro to Printmaking class starts Jan. 10th on Thursdays at The Drawing Studio print lab. I'm going to be kind of a TA, helping Tom Lindell and Jennifer Clarke...mostly helping out during the Solarplate sessions and the cyanotype session! You can find the class here on page five of the online catalog. 
Until next week,
Ciao,
~Reb